Tutorial Links

Wednesday, August 24, 2016

Guest Blogger: Eleanor from Down Under


Hello, fellow sewing machine fanatics

Eleanor from Sydney, Australia has been working on her Husqvarna in between dealing with her responsibilities as secretary of a lawn bowls organization.

Yep, I had to look up lawn bowls, which I had never heard of.  The photos look kind of like bocce ball, but since I have never played that sport either I can't really say.  Both seem to involve flinging small wooden balls around.  It is winter in sunny Sydney and any outdoor sport sounds good to me about now.  Sammie and I had to give up our outdoor walks months ago when the Southern heat and humidity kicked in.

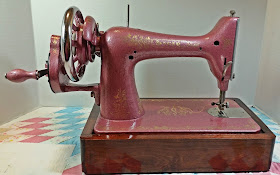
She has been sending me pictures of her progress in repainting a Husqvarna, from crinkle green to hammered copper, and I have finally gotten around to putting them together here.  The Husqvarna is shown first.  Then at my request she also sent pictures of a lovely 66 repainted a bright blue, so keep reading until you get to that one.

All photos are by Eleanor and all text in quotes is from her emails to me.

Original color


First coat


"As promised, I got started. Very cold here in Sydney (my last excuse to you was that it was too hot!), so, I've rugged up in my thermals and sitting out on my back verandah putting the first coat on. It looks like a dog's breakfast! As you can see, I changed my mind again on colour and have gone the hammered copper route. I think this will suit the machine and if I'm able to work out how to do water slide decals, they'll be black. I've found the font type and the water slide printing paper on eBay, haven't purchased yet. "


"So I got the brushes out again and worked on my bits while the mood struck. The tin says one coat should be sufficient on previously painted metal in sound condition. I guess they hadn't met Godzilla finish, or my need to work quickly around fiddly bits."


Treadle flywheel and pitman


Second coat

"Just sending you some more pics to show that I haven't gone to sleep on you again with it. I've put another coat on today and it is starting to look a whole lot better. I'm very happy now with my colour choice.. It's my first experience with a wooden pitman, so it would be nice to restore it back in its own treadle."


Third coat


"I put another coat on today to patch the bits of green that were still persistently showing through. I think I'm nearly there. I must now get the water slide decal paper for our laser printer and start searching for some images."

* * * * * * * * * * * * * * * * * * * * 

and if you thought all that was fun, just LOOK at the bright blue Singer 66 she repainted.


 "This machine was picked up out of a ditch by my friend's son and sat in her yard for twelve months or so before coming my way. It took me about three months of occasional fiddling to eventually get it turning over. The Lotus decal is the most common 66 pattern seen in Australia and I have three other lovely ones, so felt no guilt in repainting this one."

I sure wish the Lotus decal was that common here in the US.  Red Eye is our common pattern.  Also lovely but I particularly like the Lotus.


"This is the one with the Indian crank, which you now know all about and I use it a lot."


She is referring to a discussion of hand cranks from India, available in Australia but not here in the US.  Notice the two holes in the mounting part.  One hole is for Singers the other is for another brand--I think it was Pfaff but don't quote me on that.  Notice the nice wooden knob.  Notice the metal ring covering the gear (as opposed to the plastic one on the Chinese hand cranks).  Notice the all around better look--no rough casting here.

WHY CAN'T WE HAVE THESE HERE?  Someone on the board investigated and found it would be cost prohibitive to import them from Australia.  But they are from India.  Why are our suppliers not importing the Indian version?  I will have to do some nudging on this.  


"I had been following your blog and missewsitall and thought "what have I got to lose?" My freehand calligraphy could be better, but I don't really mind it"


"The little arrow markings were personal fake tattoos and worked well. I gave it a spray of clear coat too."   

Aha, I thought I was the only one who had thought of using the fake tattoos.  You will see this again soon on the machine I have decorated for 6 year old Clinton.


Lovely work!  Thanks, Eleanor.  Looking forward to seeing the finished version of the Husqvarna too.

Saturday, August 20, 2016

Paint Along 11: Clear Coat


whoo hoo!  Am I proud of the results?  You betcha!  (last name blurred out of photo for privacy)
Just joining us in the paint-along?  You can catch up here.

I took NO photos during the clear coat process, sorry about that.  But I do have critically important information about the products you might choose.

For the zillionth time I will remind you that I am NOT an expert.  I am an experimenter.  I report the results here so that you can avoid the mistakes that I make.  And I usually analyze the mistakes in detail for that reason.

The exception to the "report all mistakes in detail" policy clicks in here: this machine is a gift to a 6 year old girl (her twin brother will get a machine also).  She has been following the photos on the blog and maybe reading the posts too.  So I don't want to point out every tiny problem that arose and spoil her enjoyment of this beautiful machine.  And the problems WERE tiny and the machine IS beautiful.


However.  You knew there was a "however" coming, didn't you?  I tried something different on these machines.  It worked wonderfully on Nellie's machine.  On Clinton's, not so much.  And I do have to tell you about that.


In the past I have used a spray-on clear coat. specifically Rustoleum Acrylic Lacquer Crystal Clear, gloss (image from amazon.com) .  No problems with this, but I am good with a spray can if I do say so myself.   Technique is everything.  Lots of light coats.

But I really prefer brush-on paint.  I like the control.  So this time I used a brush on acrylic lacquer.   I put one coat on Nellie's machine, which had been freshly painted with hammered paint.  Worked great, looked terrific.


I moved on to putting it on Clinton's machine.  There will be future posts on that one.  I took a decent looking black Spartan (Singer model 192, the budget model of the 99) and applied temporary jewelry decals for some dragon-y bling.  Again, more later on all that.  Then I brushed on the acrylic lacquer.  It had some tiny bubbles and a big wrinkly area.  I sanded it off on the bed, reapplied the dragon, and tried again.  Same wrinkly area plus another one.

bubbled bed


I was now officially too terrified to apply a second coat to Nellie's machine.  I considered taking my other black Spartan and starting over, but it wasn't as nice as the first one.  I'm still thinking it over, but for now I think I will just quit while I am behind.  Emily says it is not that bad.

This is the first time I have applied an acrylic lacquer clear coat over an existing finish.  I am guessing that this is the problem.  On another, much older machine, I applied a wipe-on poly to protect the fragile decals, and that worked well.  However the original clear coat on that (I'm assuming shellac) is a different beast than the original clear coat on a 1960 Spartan.  So (never forget the NO EXPERT part) I have no recommendations for anybody about anything if you are working with an existing finish.  There may be more experiments in the future.

 Chime in if you have any experience with this.

Meanwhile, back to the pictures of Nellie's finished machine.


 Tensioner reassembled, easy peasy if you took photos as you disassembled it.  which I did.


Bobbin winder.  Way more complicated to reassemble and I inexplicably did NOT take photos as I disassembled it.  And the Spartan and 66 bobbin winders that I had on hand for comparison are different.  So this took me an hour to figure out, but here it is.


By the way, when you replace the solid hand wheel with a spoked hand wheel, the bobbin winder may no longer engage with the wheel.  The Singer 99 was made for decades and there are different versions of the bobbin winder and I have not seen all of them, but the ones I have seen all have this problem.  There are several "fixes" for this.  Simplest one is to buy a Sidewinder.  As usual no one pays me to recommend products.

image from amazon.com
I am now the happy owner of not one but TWO Sidewinders (thank you, Heidi!).  One for upstairs sewing in the antique machine museum, aka the living room, and one for the downstairs studio.  I find winding a bobbin on a hand crank machine very tedious.

Another simple fix is to remove the top screw that holds the bobbin winder in place.  This allows you to slide the bobbin winder down to make contact with the hand wheel.  You have to hold it down with one hand while turning the crank with the other hand.  A tiny bit awkward but it works just fine.  (This is the fix I was just telling you about Lynda).


screw removed


.

The single thing I did not paint pink is the black plastic piece you can see here, which protects the gear inside.  I was certain that the paint would not stay on the plastic.

This concludes the paint-along folks, but is not the end of the posts on painting machines.  Eleanor has sent me more photos of the Husqvarna she is repainting and you will be seeing that.  And I blinged up Clinton's black Spartan in some interesting ways that I am looking forward to sharing with you!


Saturday, August 13, 2016

Paint Along 10: Decals


Here we are, friends, many months into this journey.  Could be worse.  I just finished up a quilt for Nellie that I began 4 years ago.

(and if Nellie and Clinton take a look at this:  there IS a quilt for Clinton too.  Not a pink one.)

If you have just found us for the first time, you can catch up on all the previous paint-along posts here.


I recommend at least a one week wait after coats 3/3.1 (just a few tiny touch ups after coat 3).  But life happened and it ended up being a 2 week wait.


Supplies

  • The sewing machine.  D'uh!
  • The waterslide decals. (see the last post for decal sources)
    • Make two photocopies of the decals.  It does not matter if you copy them in black and white or color.  Check to make sure that they are the same size as the originals (put one of the copies on top of the original and hold them up to a window or light source).

  • Scissors
  • A bowl of warm water.  Warm is what the decal manufacturer recommends.  Mine started out very warm but by the time I finished a couple of hours later it was air-conditioned-room-cold.  I thought that might slow down the release-from-the-paper time, but it didn't.
  • MicroSet and MicroSol.  (see this post for sources, or just go to amazon)


  • Two tiny paint brushes (super-cheap ones will do.  like the kind that come in kids water color kits) and another firm small one.  
  • Paper towels
  • Painters tape
  • A stopwatch (the clock feature on my phone has this)

Decal Placement

If you are lucky, the decal manufacturer will have provided pictures of the exact model of your machine with the exact decals that you bought.  I was not lucky and I am providing feedback to the seller privately about this.  Privately in this case means "not eBay feedback" because obviously I am telling all of you about it.  

In addition, the decals I got did NOT exactly fit the machine and hand crank as they were advertised to do.  However a quick check on eBay just now shows that the only other decals available for the Singer 99 are the filigree design.  Although filigree is pretty, I wanted more bling for the buck.  

Whether you buy decals that reproduce the original Singer decals, or fantasy decals that are not exact reproductions, you should practice the decal placement ahead of time.  You will discover what works, and what does not work and will need tweaking.  I have had minor size and placement problems even with the Singer reproductions.


So, take one of your photocopies and cut out the decals.  Stick them on the machine with the painters tape.  Use the other photocopy to make notes about where each one goes (bed front edge, pillar back, etc.)  Use PENCIL to do this and have an eraser handy.  Because the seller did not provide photos I moved things around quite a bit as I worked out where everything needed to go.


The decal shown above was obviously not meant to go here.  But by clipping the bits apart I can MAKE it go here.


On the long arm I wanted to get the placement right, and did not trust myself to be able to eyeball it and slide it into place quickly.  I moved the photocopies down below so that I could line them up properly.


Decals

Do you have all of your supplies assembled?  OK, let's go.

start with something small and located on a flat-ish surface.

Cut out the decal as close to the edge of the image as your skills allow.


Drop it into the warm water and start your stopwatch.

Remove the paper placement image and tape just for that small decal.

Brush a tiny bit of Micro Set onto the place where the decal will go, and the immediate area around it.

By now my stopwatch reads somewhere in the low 20 seconds.  I wait until 30 seconds and remove the decal from the water.  The decal instructions said 30-40 seconds but in my case 30 was plenty.  If it does not slide off the backing paper easily, you need to leave it in there longer.  And I am sure that you could have figured that out for yourself, but my goal here is to cyber-hold your hand through the whole process.

Hold it in position near the spot where it will go and START to slide it off.  Have a little bit sticking out past the paper.  Put that in the right spot and hold that edge down with a finger.  Then slide the rest of the paper out from under it.  No way to photograph this while it was happening!

The closer you can get to the proper placement and alignment from the moment the decal touches the machine, the better.  The larger the decal the more critical this is.


I worked from the top down.

And speaking of the larger decals:  You have to turn them into smaller decals!  Trust me on this.  The larger they are, the trickier it is to deal with them.  The long bed edge decals, for example, can be cut into small sections.  Look for tiny gaps between the motifs.  Then start at one edge and apply them one at a time.


Above, arm front.  Below, bed front.


You do have a few seconds in which to slide it into a better position if you didn't get it perfect.  Better yet, forget all about perfect.  You will be much happier with your results if you assume from the beginning that perfection is impossible.  I have done several machines and none have "perfect" decal placement.  All are gorgeous anyhow.

If you do crinkle up the decal, don't panic.  Dip your tiny paint brush back into the MicroSet and straighten it out again.  I crumpled and folded up one small one so badly I thought I was going to have to throw it away, but with some patience I was able to manipulate it flat again.

Once the decal is where you want it, take your slightly damp paper towel and gently blot off any extra MicroSet.  Start from the center of the design and blot outwards.  This will move some of the extra MicroSet out from under the decal and will also push the decal down into the texture of the hammered paint.

Use a bright light to examine the decal.  If you see wrinkles or bubbles you can also take the small firm paintbrush and/or one of your fingers and press the decal down.  If you see an air bubble under a larger decal you can puncture it with a pin and press the air out.


The biggest problem I encounter, and I have encountered it with EVERY machine I have done, is on the convex surface of the pillar top.  The decal has to curve over this surface.  If you just stick it on there, there WILL be wrinkles.  So cut into the decal in the way that you clip curves on a curved seam.  This will allow the decal to spread out a tiny bit and slide over the convex surface.


The clipping shows up better on the back side than on the front.


Another problem can arise with larger decals that go on flat.  Larger decals can trap air bubbles beneath them.  AMHIK.  I took my scalpel and cut tiny slits into the center before putting it in the water bath.  This way the bubbles can escape through the slits.


All finished with your decal application?   Brush on a bit of Micro Sol and then leave it alone.  With small decals, put the MicroSol on immediately after you finish each decal application. If you have cut a large/long decal into sections, wait to put the MicroSol on until after all the sections are applied.

The MicroSol softens the decals and they are much more likely to tear if you mess with them once this is on.  However, I did go over a few places where they looked like they should be pressed down more firmly, using the firm paint brush to tamp them down.  I did this VERY CAREFULLY.

I noticed a particular angle of light in the studio where the textured nature of the hammered Rustoleum showed up beautifully.


It is BOTH textured AND smooth and glassy.  Fabric glides over it beautifully.  Let's remember why I recommend hammered paint for your first sewing machine paint job:  It is very forgiving.  It will cover up small chips in your original paint job.  And you don't have to strip off the original paint.


The decal seller recommended putting the gold decals over dark color or strong jewel tones.  And I believed this.  The contrast between the pink machine and the gold decals is too low for the decals to show up well from across the room.  But when little Nellie is sitting right in front of the machine it will show up very well and look pretty.  Princess pretty.


Let it all dry overnight and then apply clear coat.  That will be the subject of the next blog post.  See you then!