Thursday, April 8, 2010

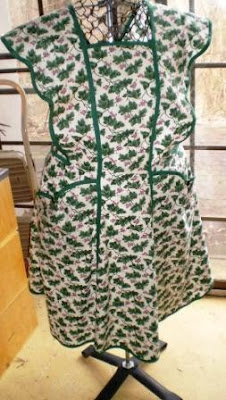
Apron Fest, Part III


The apron craze continues, this time with a vintage pattern printed in 1944, McCall 1124.  I redrafted it and made the first one in lavender.  I liked it but the pattern needed tweaking.


I tried a version with three fabrics in teal and brown.  The pattern was good but still not perfect, so I made more changes and tried one last time in my favorite colors of teal and purple.

That one is a keeper.


Next I copied a vintage bias apron with really beautiful hand embroidery.

No way will I ever be able to duplicate the hand embroidery, but I would like to have a pattern on which I could put some machine embroidery.
This pattern also had to be enlarged a bit (of course!).  I worked it up first in a red cotton tablecloth from the thrift shop.  I didn't really like the green bias on it, but that's one of the colors I have on big spools and the other colors (pink, lavender, black) didn't work at all.    The fit was close, tweaked the pattern again and cranked out an apron from a beautiful paisley.
And once again the itsy bitsy 40's pocket just does not work for me, so I create an homage-to-the-1940's heart pocket.   It looks silly, I think, but then silly is good, right?
This pattern is much faster than the earlier ones, and I will probably make one more with embroidery.


I'm sensing the end of Apron Fest approaching, but there are still a few more to go.  I'll make the very first one in the series again once I find the right fabric.  I will make a couple of cafe aprons for Emily.  I will embroider a bias apron one of these days.  I'm going to make the European clothespin apron that I saw on the Mother Earth News site.  By then I probably will have fallen in love with even more apron patterns.  I  picked up a copy of Apronology at Joann's yesterday, which was probably a mistake, but a very yummy one!

Why so many aprons?  The simple answer is that I have been having too damn much fun to quit.  These are quick and easy--at least compared to making quilts.  They have taken from 5 to 10 hours to make.  (Hence my standard answer to people who say "you should sell these":  Nobody wants to buy a $135 apron.  $10 for materials, and I think my labor is worth the same as the yard man, the handyman, and the former cleaning lady, all of whom earn around $25 an hour.  All of whom have specialized knowledge and skills, and two of whom own their own expensive equipment, just like me.)

In a way, this is just like doing social science research:  pursuing a line of inquiry to see how far it can take you.  I'm pursuing the making of aprons and I haven't reached the end of my inquiry yet.

So what will be the fate of these aprons?  I will keep the ones I like the best, which so far is the green Susan Branch, the dragon apron, and the purple and teal 1944 apron.  I've given Helen the blue and pink Susan Branch but the fit is not quite right for her and I plan to make her another custom-fit one.  Hey, she is the Best Mother-In-Law On The Planet*, and hence deserves the best apron possible.

          *Not an exaggeration.  Not hyperbole.  Just ask ANYONE!

Helen's church does a craft fair fund raiser around Christmas time, and she and I will be presenting a table of goodies for sale.  That's where the rest of the aprons will go.  That way my labor cost really doesn't matter to me!  Funny how psychology and economics interact......

All of the customers for these aprons will need to be my size, however, since I custom fit all of them.  So all you fat ladies with a right shoulder 2 inches lower than your left shoulder, have I got a deal for you!

Saturday, March 13, 2010

And More Aprons

as advertised, Apron Fest continues

This is a vintage (not reproduction) apron pattern, Simplicity 4492, I'm guessing from the early to mid 1960's.  It is definitely pre-1967, since there is no zip code in the address on the pattern.

It originally had 3 sizes (S-M-L), interestingly all on separate paper pieces rather than the combination of sizes on one piece that we see today.  And of course the large had to be missing, because that is the size I need. 

When I drafted the new pattern I also made it longer as well as wider.   The first attempt was the one in green shown above, and it was too large at the neck so I put in some neck darts.  Other than that the fit was fine, which is surprising given the fact that it was a re-draft of a vintage pattern, but I guess aprons are pretty forgiving as to fit.  Of course mine does not look much like the pattern envelope, probably because I don't have a 17 inch waist!

This was a fun pattern to sew.  The ties are attached by encasing them within the front darts, which meant that it was easy to adjust them to my waist position.  The pockets are humongous, and there are three of them.  Jean at Quilted Cupcake talked about having aprons for different purposes, and this is a good house-cleaning apron because you can stow cleaning supplies in one pocket, stuff to be moved to another room in the next pocket, and trash to be discarded in the third.


Having perfected the pattern, it was time to road test it again to make sure the pattern was just right.  You might think that with hundreds of yards of fabric in my stash it would be easy to pull out some great apron fabric.  But I learned on the first apron to avoid light colors and although the bottom of this apron looks like a straight line it is actually curved, which ruled out geometrics.  And I needed 2-1/4 yards.  And it needed to be a somewhat substantial cotton.  There probably is something suitable in the stash, but I couldn't find it.


I did however dig out a dragon bed cover and put it to work.  A dragon apron is perfect for the studio, natch.


And look how nicely the edges of the cover worked on the back panels.


Good thing Bob is used to living with a Dragon Lady.  He's not scared of dragons!

Wednesday, March 3, 2010

Apron Fest

I have been listening to the Quilted Cupcake podcast and got inspired to make some aprons. Thanks, Jean!

I started with Simplicity 3544, which is a re-issued (and resized for modern bodies) set of vintage aprons.  It's a great apron and I totally love it except for one minor point:  wearing it makes me look like a large, overstuffed chintz armchair.  I thought the lines would be slimming, and maybe they would in a different fabric.  I will make this one again in a darker fabric without big leaves and grape clusters!

It's a put-on-and-leave-on-all-day apron because of the fussy cross straps and buttons in the back.

Best of all are the deep, capacious pockets in the front.


Next I downloaded a free Susan Branch apron pattern, also very vintage-y, and also with nice lines.  I knew right away that it would be too small, so started by adding an inch to the front piece. 

A while ago on eBay I found 100-meter rolls of bias tape, and used the pink on this one and the green on the other aprons.  

It was still too small and also too short, so I lengthened and widened each pattern piece and tried again.


Finally, apron perfection.  I love it except for the lack of pockets.  I gave it some thought but decided that pockets would spoil the lines.

All three of these fabrics were from the thrift shop.  This black/fruit piece was 9 yards!  Thrift shop prices are usually 50 cents to $1 a yard. 

Apron fest is not over.  I will make the cross-strap one again, some cafe aprons for Emily and a couple more vintage patterns in my collection.  Those will definitely need re-drafting, so I wanted to start with modern patterns first.

Sunday, January 31, 2010

Snow Dyeing


We got 6 inches of snow this weekend.  I am in the middle of a 5 week online course at Quilt U on dyeing cotton from Marjie McWilliams, so my studio is all set up for dyeing.  Perfect circumstances to try snow-resist dyeing. This wasn't part of the course, just a side project.

Looks like a giant snow cone, doesn't it?  the fabric is scrunched up on a screen over a bowl.  the dye is squirted over the snow.  As the snow melts the dye runs down into the fabric, making pretty patterns (or not).    

The photos above look better than the actual results, which are not quite as bright.  The only one I am in love with is the red/orange/yellow one.  The other two have ......possibilities.....

I also tried this on a yard-and-a-half of t-shirt fabric, which I think is a poly/cotton (based on the flame test).  Because of the polyester content I knew it would not absorb the dye as well, I just wanted to see what would happen.  The photo again is better than reality

Monday, January 25, 2010

Three Baby Quilts


I've been sewing up a slew of baby quilts.  My friend Amber had a twins (boy and girl), and my niece Ravon had a little girl.  And how nice that the younger generation discovers the gender of the babies before they are born--how nice for us quilters!  Because I could get a head start, I actually got Amber's quilts delivered before the babies arrived.  I didn't quite make it with Ravon's (Christmas took up a bit of time), but I did get it done in time to take to the christening.

I used (and modified) a pattern from Jenny Wilding Cardon's Little Box of Baby Quilts, which is just adorable.  The quilts are very cute, there is a wide variety, but it's the "little box" format that I just love.  Each quilt is on a laminated card or two, so you just take them out to use--no book to prop open.


Amber and Greg painted the baby room green, and I had her send me a paint chip so that the quilts would coordinate.  I chose colors to coordinate with the map on the back of the quilts.  here's the map on the back of Nellie's and Carla's quilts.  the map on the back of Clint's is similar.


On Nellie and Clint's quilts I embroidered the label--actually the info is scattered around on the back of the quilt.


I popped Carla's quilt into the frame right after I took Nellie and Clint's off, and I forgot that I hadn't done a label yet.  I had to add it after it was quilted, but that actually worked out quite well.  Aurora had been to see the baby by then and had an adorable photo of her.  So I did a printed label, the first time I have ever printed on fabric. Cute baby!


I do love making baby quilts.  The vivid happy colors are among my favorites in the color world.  The photos above do not do them justice.  I recently took a course in Photographing Quilts at Quilt University, and they have gotten better but I still have a way to go.  Better lighting is the answer I think.


Friday, October 16, 2009

Folkwear pattern binder

Media in the studio:  all of the extended editions of Lord Of The Rings and all of the commentaries and special features.  This has been going on for quite a while and will continue.

I' ve spent a  couple of pleasant afternoons scanning all of my extensive collection (2 file drawers full) of Folkwear patterns, fronts and backs, printing them and putting them in a binder.  This will make it much easier to browse through them, and I'll have all the yardage info at my fingertips also.

I've been collecting these for ages.  The older ones have gorgeous illustrations.  The modern ones make even gorgeous garments look dull.

Tonight I will be continuing this project with all of my other patterns, and will do a thorough weeding-out at the same time.  Those 80's shoulders will never touch my body again.  It was quite a power look for women, though, or it could have been if not for the 80's hair and the 80's earrings.

Tuesday, September 29, 2009

Lush Life

Lush Life:  The Fall Collection
Media in the Studio:  Eureka, Season 2 and 3.0, lots of other stuff


About 10 years ago I started thinking that the soft sided luggage I made in the 1980's was due to be retired from active service.


I had an image in my mind of the perfect fabric.  I searched for a long time, never found anything like my vision, and eventually almost forgot about it.  Then, while looking for fabric for Helen's sewing machine cover, there it was--the exact fabric from the vision.  Title of the fabric is "Persia" and it is a tapestry weave upholstery fabric.


I bought 5 yards and just started sewing, without any master plan.  I looked at the bags that we actually take on various trips and duplicated them, using the same Butterick pattern from the 80's (4105), along with garment bags, drawstring bags, and a giant tote. I had bits and pieces of other upholstery material that coordinated with the vision fabric, and many years collection of bits and pieces of trims, mostly acquired from thrift shops (and supplemented during several trips to JoAnn's).

I had way more fun than is allowed by law.  The sumptuousness of the fabrics and trims kept me entranced.

I can never resist adding an element of humor.  The completely over-the-top nature of these bags is the big joke, since my husband and I are strictly jeans-and-t-shirts types and stay in cheap motels when we travel.  The title represents the appearance of the bags, of course, but is also an inside-Hillsborough joke.  Pretty much everything about the massaged and marketed promotion of history here in "Historic Hillsborough" strikes me as funny, including the annual jazz festival held in honor of Billy Strayhorn, whose only Hillsborough connection is that he spent a couple of summers here as a kid.  Billy Strayhorn: Duke Ellington collaborator, composer of "Take the A-Train" and "Lush Life" (which is also the title of the PBS biography of his life).  Explaining just why this is funny would take way too much time but if you want the background, feel free to read my doctoral dissertation on the relationship between people, place and history here.  ha!

Thursday, September 3, 2009

Stargate Quilt


Stargate Quilt
When Patty and Len got married I promised them a Stargate quilt. We are all big fans of the show. It took me several years, but I finally finished it in time to take it up there for my nephew's wedding.


The top photo shows the front of the quilt. If you don't know the show, the Stargate opens with a whoosh and allows you to travel to stargates on other planets.


The back of the quilt is in an informal strippy style with several Egyptian themed fabrics and leftover fabric from the whoosh.


Many thanks to the Stargate fans at the SyFy bulletin board.  I asked them for help early in the project design phase, and they responded generously.  At that time I planned to embroider sayings on the quilt, but when it came down to it, simple names worked better in the design. 

I hope they will agree about the design and forgive me for asking them for help and then not using their suggestions except for one or two, such as "Ya Think?"  and the title of the quilt is "Indeed".  Thanks again, folks, you were great.

My favorite part of the quilt has got to be the chevrons.


They are three-dimensional because they are attached only at the top and bottom, which gives them a bit of depth.  I found just the right fabric for the glowing part.  The photo also shows embroidery details that mimic the details of the gate, and the embroidered gate symbols.  My thanks here go to the unknown person who created a TrueType font of the gate symbols and put it up in Wikipedia.  My embroidery machine will do any True Type font.

Finding the font was a huge aid to the project, as was finding the stargate whoosh, a fabric titled "radiant orb", once available from equilter.com.  But sadly, available no longer.

Friday, July 31, 2009

More embroidery on patchwork

Media in the studio: Legend of the Seeker (on Hulu). Mindless entertainment for sewing.

I have finished Lesson 2 of the Quilt U Embroidery on Patchwork class and here are the results. Too bad about the image quality, it would be nice if the pic showed the details.

The class project is a table runner, which I would never use. So I think it is going to be a large shopping bag to hang on the back of my scooter.

Monday, July 20, 2009

Quilt U: Embroidery on Patchwork

Media in the studio: Freddie Mercury, Magic Remixed on VH-1

I'm taking another class at Quilt University, this one titled Embroidery on Patchwork, from Joanne Winn. I just finished her Beginning Machine Embroidery class at Quilt U. These are great classes, very practical and informative.

Choosing the fabrics for the project, which will be a tablerunner.

Handbag 001


Doings on Thursday and Friday, July 17 & 18
Media in the studio: Excalibur.

I have covered a small cardboard box to serve as the inside bottom of a series of handbags. All the stuff will live in the box, which can be moved from handbag to handbag. The idea came from something similar that I saw on QVC.

This was a spray adhesive project and I used scraps of an ethnic weave left over from another project. The red handles were supposed to be the same length, and I measured carefully (twice) and still screwed up. I continued with the ethnic fabrics with stuff from the thrift shop: a teal skirt, a pink placemat and a yellow woven mat much larger than a placemat.

I then started with the box dimensions, and used quarter-inch graph paper to figure out all the dimensions for the parts of the bag.


It has a rectangular base enclosing the carboard box, and then two overlapping triangles. Smaller triangles fill in the triangular gap between the two larger triangles. I finished it off with a thrift shop necklace as a weighted drape to keep the opening closed (see first photo).
Not bad. It's very soft and floppy so the interior cardboard box kind of shows. I didn't quilt the fabrics because the weave is loose and I thought the batting might beard through. The bias edges on the large triangles will stretch out over time. If I were going to do it again I might fuse a soft interfacing to this type of fabric.

Sewing With Sotomayor*

Doings on Wednesday and Thursday, July 15 & 16
Media in the studio: more of the Senate Judiciary Committee hearing on Sonia Sotomayor. Hence Jan's suggestion of the title "Sewing With Sotomayor"

I finished Helen's sewing machine cover and she is pleased with it.

Tuesday, July 14, 2009

No more secret sewing!

Media: Judge Sonia Sotomayor's confirmation hearing, Senate Judiciary Committee

I kept a journal during the creation of Greg and Amber's quilt, but never posted anything because I wanted them to be surprised.

As if they would read a sewing blog!!!

Current project: a sewing machine cover for my mother-in-law. She liked the one I made for myself when I bought my new Janome Memory Craft 4900 a couple of months ago, so I am making a similar one for her.

Mine (green) was made to showcase the decorative embroidery stitches that the machine will do, and to provide a visual encyclopedia of stitches. Hers (russet colored) is just to be pretty in her studio. She also has a Janome, but not one that does all of these stitches.

Yesterday I worked on the central panel for her cover.