Tuesday, August 24, 2010

Apron Quest: The Final (?) Adventure

the ultimate apron
I have made a whole bunch of aprons in my quest for the ultimate apron.  I tinkered with several patterns until I either decided that they weren't right for me, or until I got them to fit properly.  I have given away 3 of these aprons to family: Helen, Rachel, and most recently Aurora, and that's not counting the cafe aprons that I made for Emily.

The one I gave to Aurora was one I liked and had planned to keep, but it was more thrilling to me that Aurora wanted it.  Serendipitously, the previous week I had found the exact same fabric at the thrift shop, and plenty of it.  Looked like someone had started to make curtains and quit halfway through.  In addition to the curtain pieces, there were 3.5 yards of new yardage (and the curtain panels still new too, only partly finished). This lot worked out to about 25 cents per yard, probably an all-time-low.  Love the thrift shops!


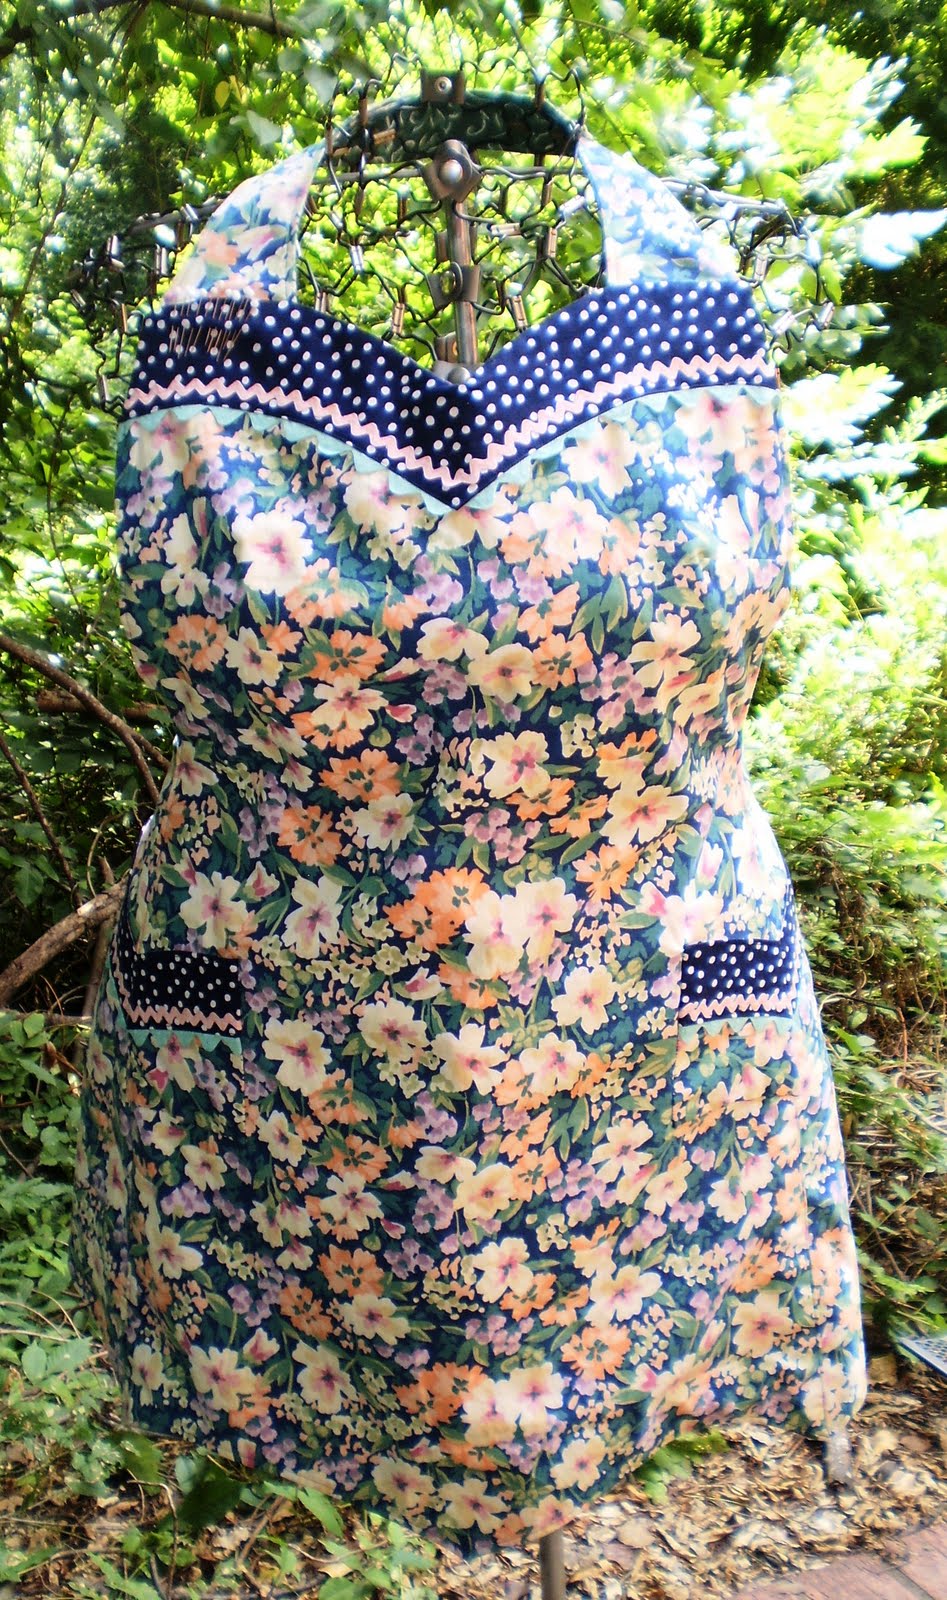
Aurora said something about expressing her inner girliness by wearing the apron while baking, and I decided to take that idea and run with it as I made another bias apron from the paisley fabric.  I recently scored a big bunch of rick rack on eBay and I went all out with the rick rack.

FOUR kinds of rick rack


I also tweaked the pattern a bit more:   more coverage through the bust and 4 darts for shaping, and a bit more reach around the back.  I lengthened it and tried a scalloped edge again.  This one is definitely a keeper. I love the girliness of the heart pockets and all the rick rack, and the black paisley is just right.  For the pockets I used, for the first time, a bit of a beautiful pink paisley that I bought at Liberty's in London back in 1986.  One of my post-retirement resolutions is to use things and not hoard them.  After 24 years I think it was time to dip into the Liberty lawn.


Other recent projects:
A little bib for baby Carla

sweetness for a sweetie pie
Emily's cafe aprons


Each apron is reversible, with a plain side and an embroidered side.
The design is her own.
embroidered dragon
gold thread
bleach-resist dragon


I made two reversible aprons and practiced machine embroidery. 
Learned how to reverse a design (easy:  select and drag it through to the other side.  everything is easy once you figure it out!)


I liked the pattern and the reversible construction was very interesting, but I don't like the finished product.  They look fine, but the pockets are all wrong.  I had to enlarge the pattern, one size definitely does NOT fit all! and that put the pockets too far around the back side.  I added a small cell phone/iPod pocket toward the front, and it looked cute but that still didn't fix the problem.  Not keepers.


And finally, Sophie got a pair of wings.   Just because.  I think she deserves them, don't you?

Saturday, August 7, 2010

Printing on Fabric: an idea whose time has NOT YET come!!!!!!!!!!!!!!!!!!!!!!!!!!!!

I've been enjoying puttering in the studio this summer, working on a variety of small projects.  Many of these will become gifts, so I'm not talking about them yet.  I like doing things slowly and letting the ideas mature as the work progresses, so even the things I am working on are not ready for publication here yet.

I just finished a course at Quilt University titled Printing on Fabric.  I've been very impressed by most of the Quilt U courses, but not this one, which seemed to be light on content.  It did provide the impetus for me to experiment with this technique and use up the supplies that I bought when I took the OTHER Quilt U course on this topic, which also did not ring my chimes.

I'm going to sound like a cranky old lady here (oh wait!  I AM a cranky old lady!) but most of the quilts I see with photos on them leave me cold.  I'm sure they have meaning to the people who produce them, and that's really all that matters.  But aesthetically most of them look pretty crappy to me.  I'd rather have my photos in frames or scrapbooks, thank you very much.

So I decided to print topographic maps and aerial photos on to fabric.  I'm searching for a less cheesy title for this project, but the working title is "places of the heart".  I had a wonderful time selecting maps and images, and editing them down to the places I love:  McGonigle and Reily and Oxford in Ohio especially, and several of the places I have lived.  I mourn the loss of topozone.com which used to have free topos of good quality.  Google is wonderful for the aerial images but somehow I can't seem to find decent topos anywhere online, at least not for free.

I have experimented with 2 different commercial fabric sheets (EQ Printables and Printed Treasures) and also made my own with Bubble Jet Set.  I have two different printers, one with pigment inks and one with dye  inks.  I included information about the printers, inks, date of printing as text below each image and I'll leave this info visible in the quilt I create so that I can track the performance as the quilt gets washed.  I plan to include a label on the back with a spot where I can write the date of each washing.

Even though I am not finished, I have come to one huge conclusion:  Printing on fabric is a BAD IDEA. 
  • Printers were not meant to do this.  They don't like it.  Fabric leaves lint down in their little bellies.  LOTS of lint, at least compared to paper.  I have run the head cleaning cycle on both printers DOZENS of times during this project, and one of them has still not recovered.
  • Fabric is not the ideal medium for photos or other images, at least not where printers are concerned.  They are NEVER going to look decent no matter what you do.
So for anyone contemplating printing on fabric, keep this in mind:  the quilting industry has one goal and one goal only:  TO SELL PRODUCTS.  All those magazine articles about printing on fabric are meant to get you to buy fabric sheets or the chemicals to produce your own.

You COULD ride your riding lawnmower to work, but just because you could does not mean that it would be a good idea.  You can print photos on fabric, too.   But I wouldn't if I were you.  And when this project is finished you can bet that I will never do it again.  I'm just hoping that I haven't permanently ruined the heads on my continuous ink systems.

Rant over.

Friday, June 25, 2010

Small Projects

Upstairs in "Studio North" I have been treadling away on two twin bargello scrap quilts.  One top is finished and ready to go on the frame.

Downstairs in the main studio I have been working on smaller projects.  I made removable covers for two tabletop ironing boards (one for each branch of the studio).

I also made a quilted shopping bag that hangs on the back of my electric scooter.  Useful at Trader Joes, Costco, etc.  I can't remember the name of the pattern but the geometry of it was fascinating.


The apron fest has continued with a cafe apron in black cotton duck for Emily.  It's her own design, with pockets on both sides so that it is reversible. I also made a European clothespin apron, pattern free at the Mother Earth News site.  The clothespin apron is one giant pocket that you can reach into from either side. It was copied from an apron from Europe, but growing up in the Midwest I saw plenty of these, usually in a white canvas.  This one is in a denim weight cotton with a fine metallic stripe.


I will make more of the cafe aprons and embellish some of them.  To prepare for this I tested monograms and my wide variety of metallic threads.  Now I know which threads work and which don't in my embroidery machine.  The most expensive thread performed poorly (Madeira) while the mid-range Coats and Clarks did just fine.  The cheapest cone threads did as badly as the Madeira.  I'll try those later in the serger loopers.


Helen liked one of the earlier aprons but she is petite and the fit was not right on her.  So I made her one and custom-fit it to her and I'm much happier with it. She wore it on Father's Day but of course I forgot the camera so here it is on the worktable. 

This time I figured out how to add pockets without ruining the lines--a line of bias trim down the center of a pocket makes it visually disappear.


Amber mentioned that she is just about ready to start the twins on solid food, so I decided to whip up some baby bibs.  I made some smaller ones for now, and a larger version with an arm opening for the toddler age. 

The flying zebras were from a pre-quilted panel (thrift shop find).

For the next set I quilted a map fabric with a coordinating geometric for the back (back not shown).  I wanted black and white stripes for the bias tape so I made some, a project that I have had in mind for years.  I love making bias tape but it does take a while.


22 yards of black and white 1/2" double-fold bias tape!


and here are the cartographic baby bibs in their black-and-white-stripey glory!  I quilted the fabric along the latitude and longitude lines, naturally.


and if this wasn't enough, I also have two Christmas presents completed, but I'm not saying what or for whom.

Jean mentioned my aprons on the Quilted Cupcake podcast, which was a thrill for me.  and later the same month I won a drawing at her site also.  I should mention that the ironing board covers that began this post were also inspired by her.  I  have certainly made ironing board covers before for utilitarian purposes, but she mentioned making some with bright fabrics and I liked the idea.

If you have actually read this far, please leave a comment!  I love hearing from folks.

update:  babies in bibs.  ADORABLE babies in bibs!  Good job on the procreation, Amber and Greg!

Wednesday, May 12, 2010

1922 Singer "Red Eye" Treadle

Some time ago my mother-in-law gave me her mother's 1922 Singer "Red Eye" treadle sewing machine.  I did some basic cleaning, then replaced the belt.  For a couple of months I puttered around with cleaning it up a little bit at a time, then discovered the treadleon.net site, which has a wealth of information about all things treadle-y, including very specific and useful info about what to do (and even more importantly what NOT to do) when cleaning them up.  Thanks to all the onions who have contributed to the site!


I kept quiet about this project, wanting to surprise Helen when it was finished.  About a month before Mother's Day my friend Jan asked me if I was planning to have it done for Mother's Day, and a useful deadline was born! I moved this project to the front burner, but miraculously still managed to hold on to the no-stress-I'm-just-puttering frame of mind.


Here's what I did:
  • Replaced the belt and the bobbin winder tire
  • Opened up the access ports and bobbin housing and cleaned 88 years of lint from the interior
  • Oiled it thoroughly several times, each oiling probably removing more of the accumulated crud inside the moving parts
  • Cleaned the irons (the cast iron bottom part), revealing the gold paint that I thought was gone!
  • Cleaned the head (the sewing machine part).  This took the longest time as I removed one molecular layer at a time with Turtle Wax Bug and Tar Remover.  It had to be done slowly so that there would be no additional damage to the beautiful decals.
  • Cleaned the chrome parts with metal polish
  • Waxed the head with auto wax
  • Reglued the loose veneer
  • Restored the finish of the oak cabinet.  This isn't as dramatic a process as stripping the old finish, it just removes a bit of the old finish and removes the water rings.  I had to chip off some paint also.  This all worked much better than I expected.  You can still see the age of the finish and where some of the old problem areas were, but it is now a uniform color and looks great, but retains the look of age.  I didn't want to strip it to make it look new.
  • Waxed the cabinet.

Before and after on the top of the cabinet


Once it was finished I used it to make a tote bag for Helen for Mother's Day.  She loves my "Lush Life" luggage and has been borrowing it when she and her friends travel together.  I had enough of the tapestry fabric left to make a tote bag.  Except for the embroidered monogram I made the whole thing on the treadle.  I would NOT recommend a tote bag with multiple layers of upholstery, quilted lining, and trims as a learning exercise for a new machine ;)   But I managed to keep the un-sewing to a minimum.

I did get everything finished for Mother's Day.  Helen was happy to see the restoration of the sewing machine, happy that it still works, and happy with the tote bag.  She told stories about her mother and the machine, and about learning to sew on it.

Saturday, May 8, 2010

Painting, dyeing, and some dragon t-shirts


I've been taking more fabric painting and dyeing classes from Quilt University.  These photos are from Lyric Kinard's Playing With Paint class.  The class included more techniques for getting paint onto fabric than I had time to complete, and here are some of the results.  Lots of fun!


Right now I am taking the second in a series of fabric dyeing classes from Marjie McWilliams.  I'll post the results after the end of the class, which is called Quilter's Palette.

I used some of what I learned in the painting class to stencil dragons on to some t-shirts.  The black and maroon shirts were done with a Clorox bleach pen, and the red one with black Jacquard textile paint.


Don't worry, apron fans, more aprons are on the way!  But the next post will reveal a secret project that I DID complete in time for Mother's Day....

Thursday, April 8, 2010

Apron Fest, Part III


The apron craze continues, this time with a vintage pattern printed in 1944, McCall 1124.  I redrafted it and made the first one in lavender.  I liked it but the pattern needed tweaking.


I tried a version with three fabrics in teal and brown.  The pattern was good but still not perfect, so I made more changes and tried one last time in my favorite colors of teal and purple.

That one is a keeper.


Next I copied a vintage bias apron with really beautiful hand embroidery.

No way will I ever be able to duplicate the hand embroidery, but I would like to have a pattern on which I could put some machine embroidery.
This pattern also had to be enlarged a bit (of course!).  I worked it up first in a red cotton tablecloth from the thrift shop.  I didn't really like the green bias on it, but that's one of the colors I have on big spools and the other colors (pink, lavender, black) didn't work at all.    The fit was close, tweaked the pattern again and cranked out an apron from a beautiful paisley.
And once again the itsy bitsy 40's pocket just does not work for me, so I create an homage-to-the-1940's heart pocket.   It looks silly, I think, but then silly is good, right?
This pattern is much faster than the earlier ones, and I will probably make one more with embroidery.


I'm sensing the end of Apron Fest approaching, but there are still a few more to go.  I'll make the very first one in the series again once I find the right fabric.  I will make a couple of cafe aprons for Emily.  I will embroider a bias apron one of these days.  I'm going to make the European clothespin apron that I saw on the Mother Earth News site.  By then I probably will have fallen in love with even more apron patterns.  I  picked up a copy of Apronology at Joann's yesterday, which was probably a mistake, but a very yummy one!

Why so many aprons?  The simple answer is that I have been having too damn much fun to quit.  These are quick and easy--at least compared to making quilts.  They have taken from 5 to 10 hours to make.  (Hence my standard answer to people who say "you should sell these":  Nobody wants to buy a $135 apron.  $10 for materials, and I think my labor is worth the same as the yard man, the handyman, and the former cleaning lady, all of whom earn around $25 an hour.  All of whom have specialized knowledge and skills, and two of whom own their own expensive equipment, just like me.)

In a way, this is just like doing social science research:  pursuing a line of inquiry to see how far it can take you.  I'm pursuing the making of aprons and I haven't reached the end of my inquiry yet.

So what will be the fate of these aprons?  I will keep the ones I like the best, which so far is the green Susan Branch, the dragon apron, and the purple and teal 1944 apron.  I've given Helen the blue and pink Susan Branch but the fit is not quite right for her and I plan to make her another custom-fit one.  Hey, she is the Best Mother-In-Law On The Planet*, and hence deserves the best apron possible.

          *Not an exaggeration.  Not hyperbole.  Just ask ANYONE!

Helen's church does a craft fair fund raiser around Christmas time, and she and I will be presenting a table of goodies for sale.  That's where the rest of the aprons will go.  That way my labor cost really doesn't matter to me!  Funny how psychology and economics interact......

All of the customers for these aprons will need to be my size, however, since I custom fit all of them.  So all you fat ladies with a right shoulder 2 inches lower than your left shoulder, have I got a deal for you!

Saturday, March 13, 2010

And More Aprons

as advertised, Apron Fest continues

This is a vintage (not reproduction) apron pattern, Simplicity 4492, I'm guessing from the early to mid 1960's.  It is definitely pre-1967, since there is no zip code in the address on the pattern.

It originally had 3 sizes (S-M-L), interestingly all on separate paper pieces rather than the combination of sizes on one piece that we see today.  And of course the large had to be missing, because that is the size I need. 

When I drafted the new pattern I also made it longer as well as wider.   The first attempt was the one in green shown above, and it was too large at the neck so I put in some neck darts.  Other than that the fit was fine, which is surprising given the fact that it was a re-draft of a vintage pattern, but I guess aprons are pretty forgiving as to fit.  Of course mine does not look much like the pattern envelope, probably because I don't have a 17 inch waist!

This was a fun pattern to sew.  The ties are attached by encasing them within the front darts, which meant that it was easy to adjust them to my waist position.  The pockets are humongous, and there are three of them.  Jean at Quilted Cupcake talked about having aprons for different purposes, and this is a good house-cleaning apron because you can stow cleaning supplies in one pocket, stuff to be moved to another room in the next pocket, and trash to be discarded in the third.


Having perfected the pattern, it was time to road test it again to make sure the pattern was just right.  You might think that with hundreds of yards of fabric in my stash it would be easy to pull out some great apron fabric.  But I learned on the first apron to avoid light colors and although the bottom of this apron looks like a straight line it is actually curved, which ruled out geometrics.  And I needed 2-1/4 yards.  And it needed to be a somewhat substantial cotton.  There probably is something suitable in the stash, but I couldn't find it.


I did however dig out a dragon bed cover and put it to work.  A dragon apron is perfect for the studio, natch.


And look how nicely the edges of the cover worked on the back panels.


Good thing Bob is used to living with a Dragon Lady.  He's not scared of dragons!

Wednesday, March 3, 2010

Apron Fest

I have been listening to the Quilted Cupcake podcast and got inspired to make some aprons. Thanks, Jean!

I started with Simplicity 3544, which is a re-issued (and resized for modern bodies) set of vintage aprons.  It's a great apron and I totally love it except for one minor point:  wearing it makes me look like a large, overstuffed chintz armchair.  I thought the lines would be slimming, and maybe they would in a different fabric.  I will make this one again in a darker fabric without big leaves and grape clusters!

It's a put-on-and-leave-on-all-day apron because of the fussy cross straps and buttons in the back.

Best of all are the deep, capacious pockets in the front.


Next I downloaded a free Susan Branch apron pattern, also very vintage-y, and also with nice lines.  I knew right away that it would be too small, so started by adding an inch to the front piece. 

A while ago on eBay I found 100-meter rolls of bias tape, and used the pink on this one and the green on the other aprons.  

It was still too small and also too short, so I lengthened and widened each pattern piece and tried again.


Finally, apron perfection.  I love it except for the lack of pockets.  I gave it some thought but decided that pockets would spoil the lines.

All three of these fabrics were from the thrift shop.  This black/fruit piece was 9 yards!  Thrift shop prices are usually 50 cents to $1 a yard. 

Apron fest is not over.  I will make the cross-strap one again, some cafe aprons for Emily and a couple more vintage patterns in my collection.  Those will definitely need re-drafting, so I wanted to start with modern patterns first.